Experiment Room

Accidental Alarm Inori

Automaton Security Bots: Form 1

Automaton Security Bots: Form 2

Automaton Security Bots: Form 7
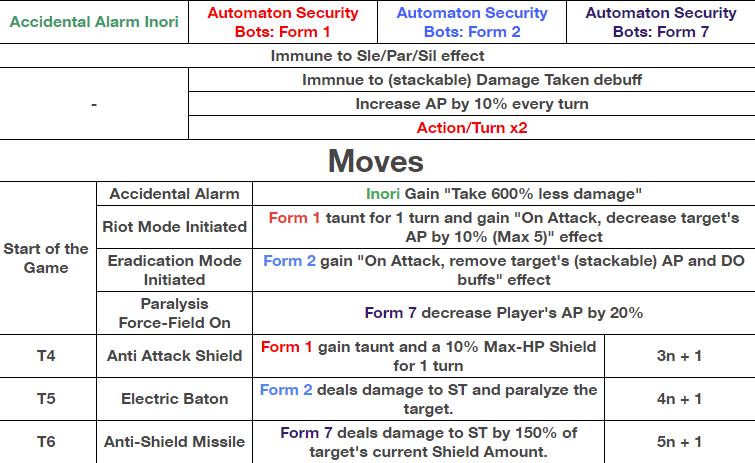
Goal: Kill all Automaton Security Bots.
A very straightforward stage. As Inori pretty much explains each Bot’s mechanic before each of their first actions. A new mechanic is Form 7 where she deals Damage based on 150% of the target’s current Shield amount. Such, if you have 2 million Shield, she will deal 3 million damage to you. This is basically to counter Daphne, especially during the combo turn.
Prefer kill order: 2 > 7 > 1 as Baton only hits much harder at later stage and it will paralyze.
TKFM-413

Ayane
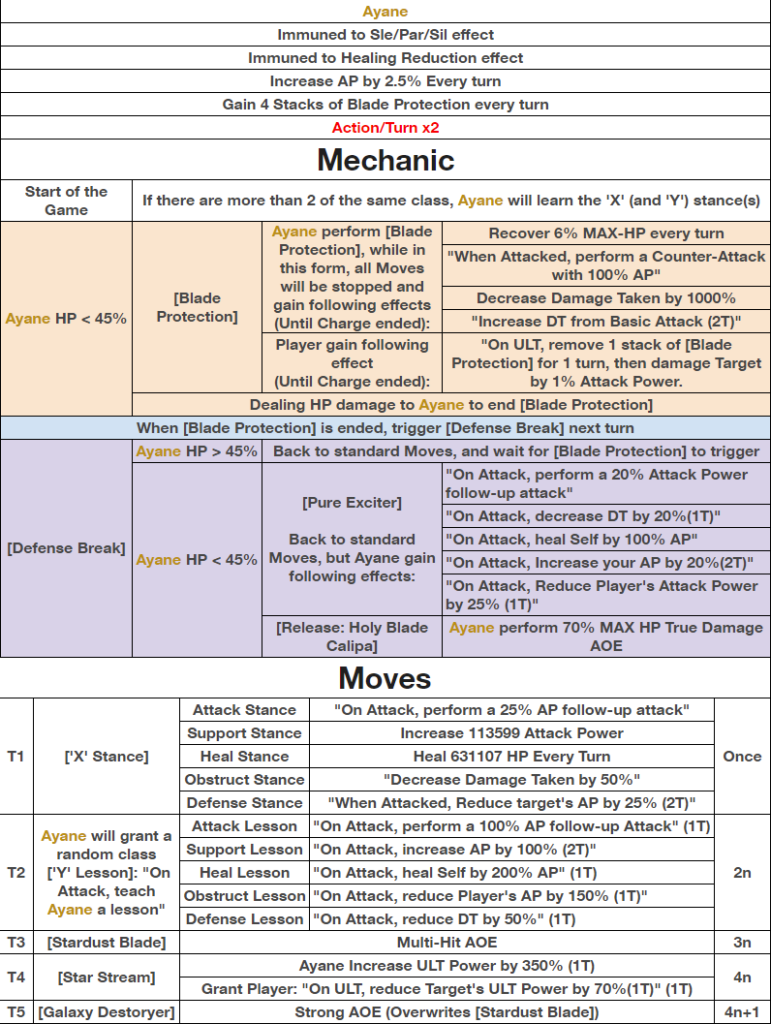
NOTE: There are a few translation errors in this stage (as least not as bad as Crimson Taboo).
First, “On Normal Attack, take 50% more damage (2T)” should mean “Increase Damage Taken from Basic Attack (2T)”.
Second, when Ayane learn lesson from Healers, she gains “On Normal Attack, heal your target by 200% Attack Power”, it should’ve been heal herself.
This stage is basically yell for burst damage (and setup for Caesar, 3* needs an Obstrutor? Seriously?). At the beginning she will do a conditional check on your roaster. If there are more than 2 of the same class, she will learn those class stance and gain corresponding buffs.
Every 2n turn, she will “nicely” ask a random existing class to teach her a lesson. When the chosen class attack her, she will gain a buff. You can either guard or use ultimate, but recommend you do the former, so you can save ULTs for later.
Every 3n, she will cast a multi-hit, [Stardust Blade], on each of the character, this doesn’t do much damage (unless you teach her lot of attack lesson)
Every 4n, she will cast [Star Stream], gaining 350% ULT Power and give Player a status, which using ULT will reduce her Attack Power by 70%. On the next turn, Ayane’s will cast [Galaxy Destoryer], a heavy hit AOE. Recommend to use AT LEAST 3 ULTs to lower her Attack Power, then rest just guard.
When her HP drop below 45%, she will charge [Blade Protection]. She sets to have 5 stacks of “Blade Protection”, which reduce 200% Damage Taken each (Total of 1000% Damage Reduction), while regaining 6% MAX HP every turn. During her charge, Player’s ULT removes 1 stack of her “Blade Protection”, since she regains 4 stacks every turn, you need to use 5 ULTs at the same turn to break her charge.
To cheese this stage, you can either set her HP to 45.x% then burst her from there in one turn, or bring enough vulnerability debuffer that can stack more than 101% (ex. Mina [25 + 30] + S.Shizuka [27 + 20]), then you only need to use 4 ULTs to break her charge. You only need to deal damage on her to break her charge, so 99% Damage Reduction is enough for you to damage her.
Flashing Victory

Flashing Fang
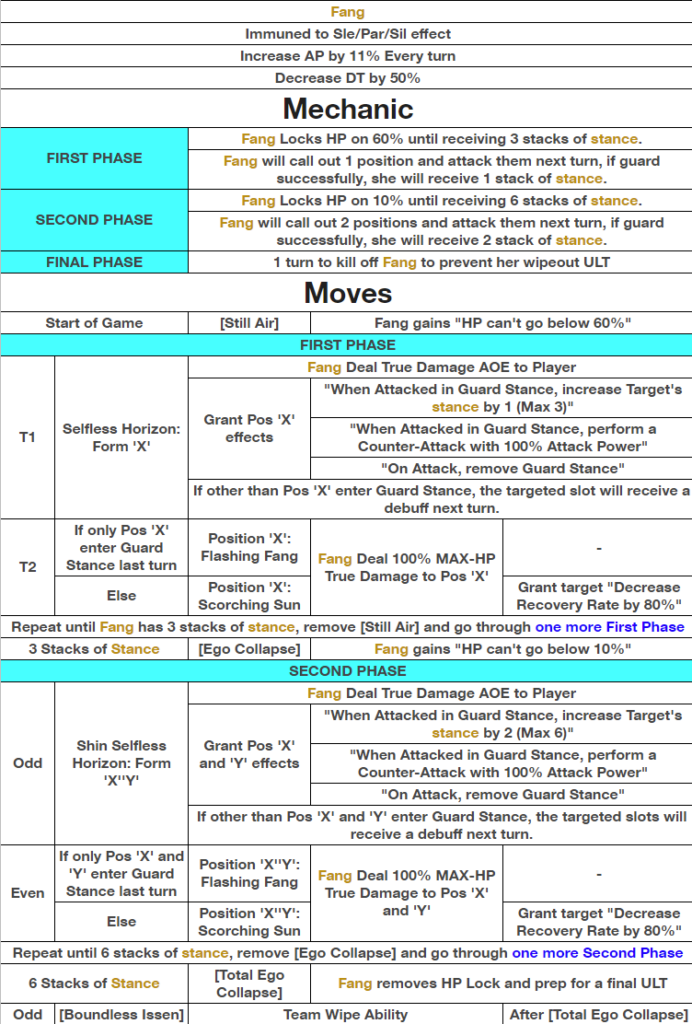
This stage is basically teaching you how to read status and not using 2X speed.
On her first phase, she will lock HP at 60%. On the first turn, she will call out [Selfless Horizon: Form ‘X’], at which she will target position X on the next turn. Simply just guard on said position. If you guard other position, position X will receive a Recovery debuff. This rotation repeats until you successfully blocked 3 times of her attack plus one more rotation.
On her second phase, she will lock HP at 10%. Everything is the same as first phase, except this time she will call out 2 positions. This rotation repeats until you successfully blocked 3 times and plus one more rotation.
At the final phase, you have only 1 turn to kill her, otherwise she will wipe your team next turn.
DO NOT bring tank in this floor, her callout attack will ignore Taunt, and tank like Satan and Evie who gain Guard Stance on Attack will get their Guard Stance Cleansed. Recommend to bring 2~3 strong heal overtime healer. The stage all do True Damage and it only gets more painful. If you only bring 1 healer, when your healer get locked down you will not able to recover. Just need enough burst to kill her at the final phase.
Crimson Taboo

Exiled Snake Crimson Taboo
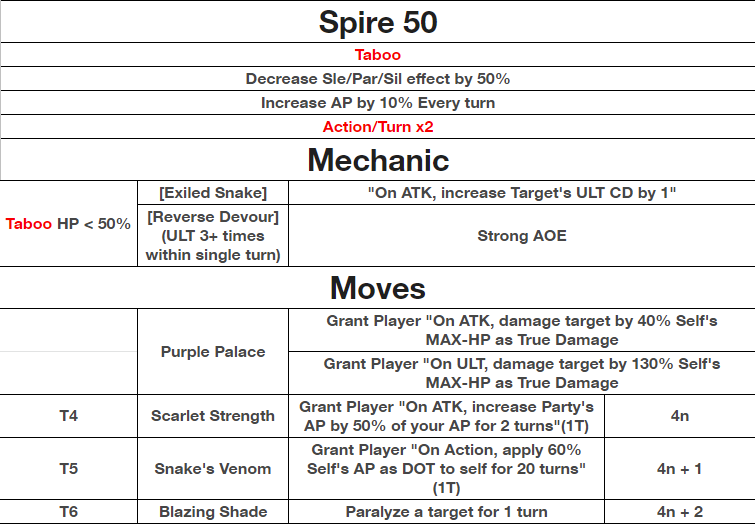
NOTE: There’s a translation error on the buff, [Purple Palace], casted onto Player in the beginning. Instead of % of Attack Power, it is % of your MAX HP. All other form of damage are negated except DOT.
This floor is very cheeky, every 4 turns, she casts [Scarlet Strength] that increases your Party’s Attack Power by 50% when you use Basic Attacks. On the following turn, she will cast [Snake’s Venom] on Player, which on action, give self a DOT 60% of own Attack Power for 6 turns. If you bring too much Attack Power buffer, you will hit yourself harder than you can imagine. Recommend to either Guard or ULT during these two turns and make sure don’t buff Attack Power during [Snake’s Venom] turn.
Beware when her HP is below 50%, she will trigger a conditional check until she dies: If Player used 3 or more ULTs within a single turn, she will cast a very strong AoE attack (If you used 3+ ULTs and dropped her HP below 50%, she will also trigger the attack).
Suggest to bring HP buffer like Miru or Hm-Fiora. Using Iris or Idol Noel is also feasible if you have them built, since DOT still can apply damage. Taboo is only 50% resistant to all status, you can use silence and paralysis to prevent her from casting [Snake’s Venom] thus neutralized her dangerous kit completely. Sleep is not recommended because Player damage is a follow-up attack, which would wake her up immediately.
Experiment Room

Special Unit Gamma

Muila

Special Unit Alpha

Special Unit Beta
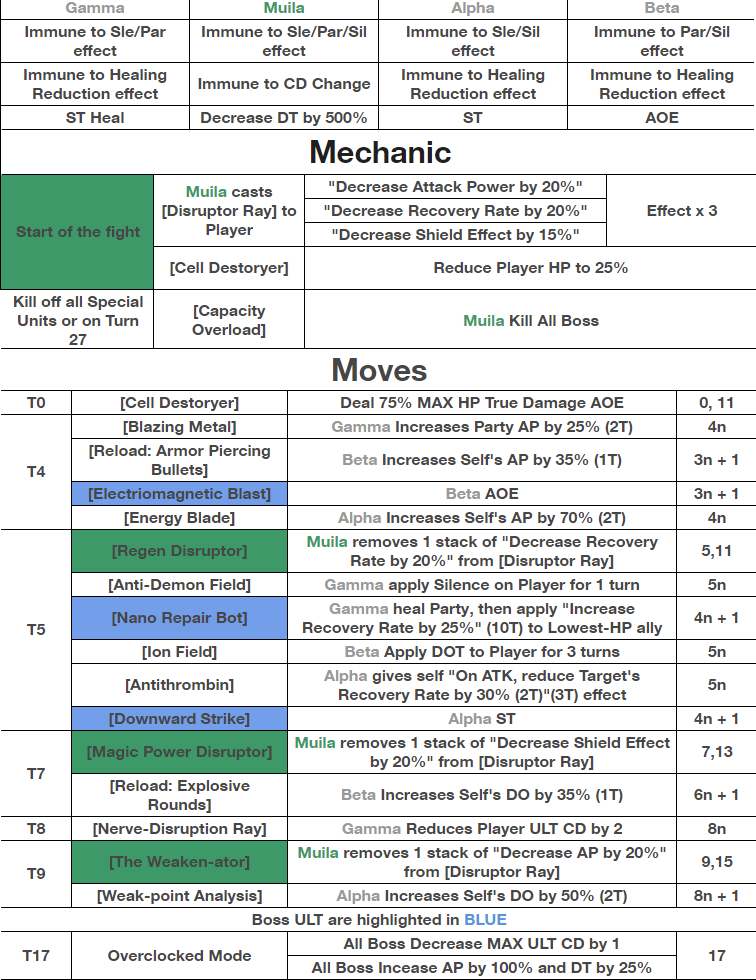
Goal: Kill all Special Units to complete the stage.
Start of the fight, Muila reduce Player HP to 25%(Milae flashback) and apply debuff that reduce Attack Power, Recovery Rate and Shield Effect. Recommend to bring strong upfront healing and/or recovery rate up.
Beware on 8n + 1 turn, where Alpha would stack lot of buff, then her ULT can one shot most character. Guard on those with weaker stat ally. Also beware on 11th turn where Muila will cast True Damage AOE like in the beginning.
Prefer kill order: Gamma > Alpha > Beta
Overall the stage is not difficult, just keep track of their Moves and act accordingly.
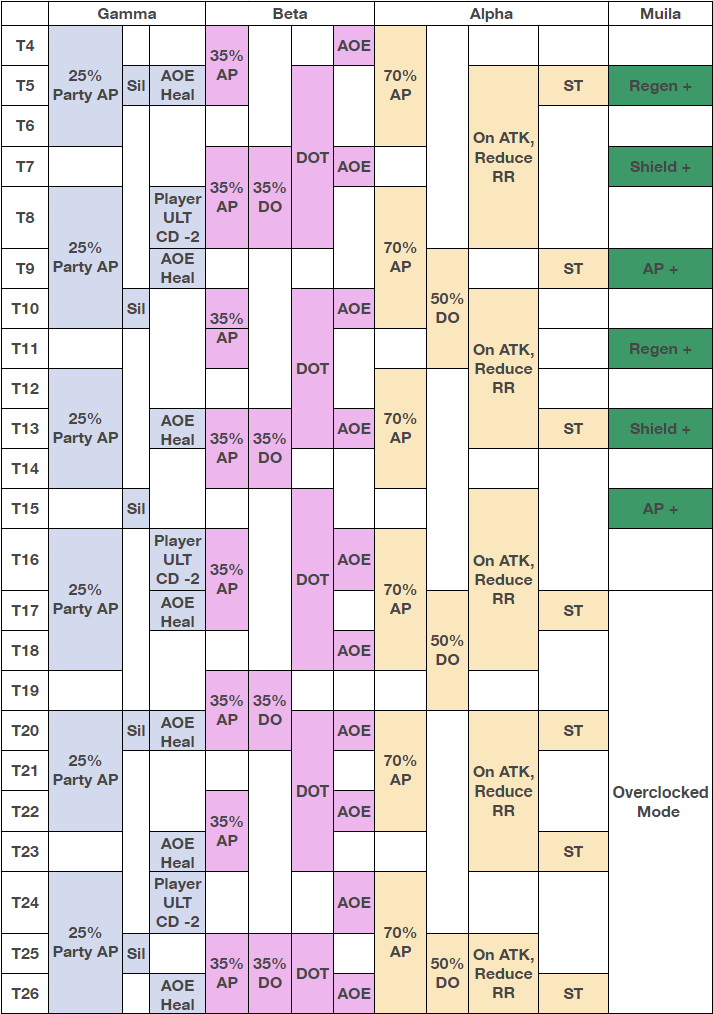
Enemy Profile

Grand Sorcerer Natasha

Sword Of Empire Juneau

Omniscient Britney

Fearless Warrior Blaire

Counter Blade Anna
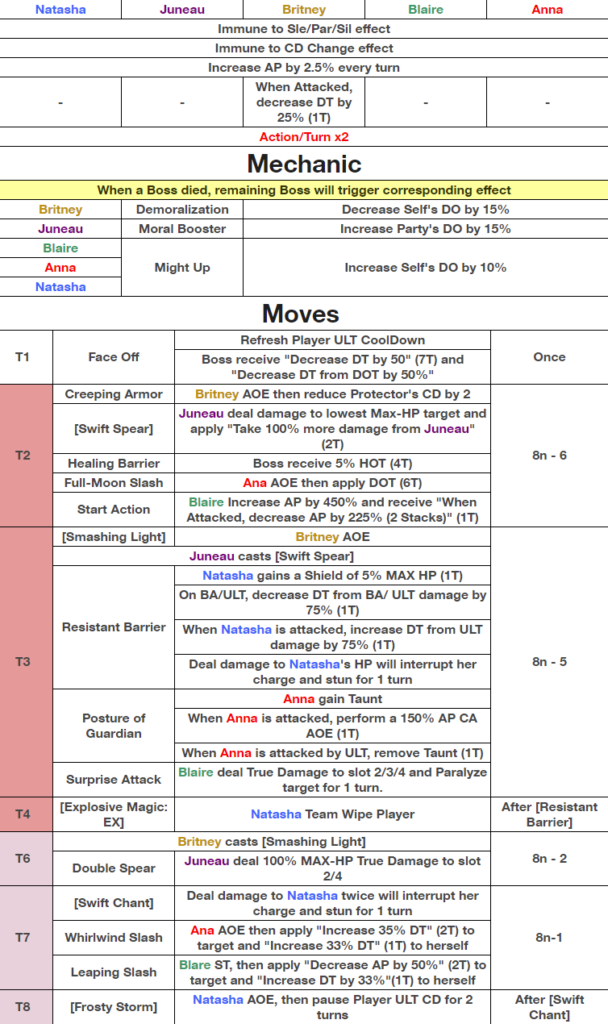
Goal: Kill all enemies to complete the stage.
The fight is basically revolve around 2 phases (mark in light pink and light purple).
On the first phase, remember to hit Blaire twice during [Start Action] to lower her Attack Power. You need to save at least 1 ULT for the following turn. When Natasha is charging, you need to use 1 ULT to break Ana’s Taunt. Then deal damage to Natasha’s HP (need to break through shield) to break her charge and stun her.
On the second phase, remember to guard [Double Spear] on Slot 2 and 4 since it is True Damage. You only need to damage Natasha twice to break her charge for [Frosty Storm].
Prefer kill order: Blare > Natasha > Ana > Juneau > Britney
The real threat is Blare as her ability deal really high damage and can paralyze.
Team comp recommendation by Lone
Enemy Profile

The Sun Minayomi

The Devil Aiko

Valentine’s Day Asina

The Star Daphne Bloom
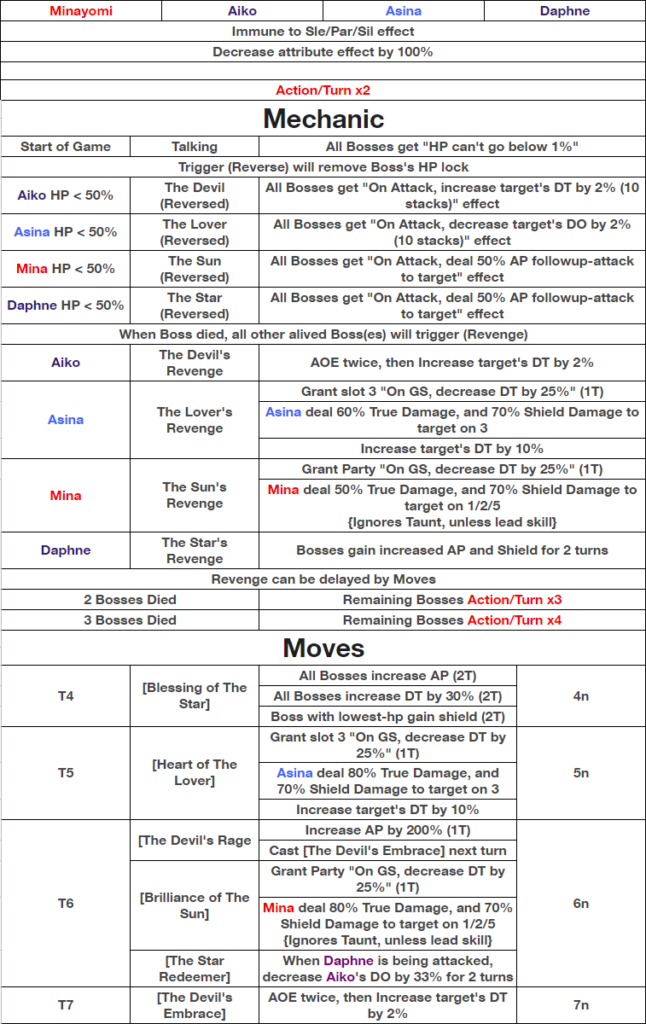
Goal: Kill all enemies to complete the stage.
A straightforward stage if you understand their moves.
At the start, all Bosses will have their HP locked at 1%.
On 4n turns, Daphne will buff the team and grant Shield to lowest-hp ally.
On 5n turns, Asina will deal True Damage to position 3.
On 6n turns, Aiko will start charging her ult for the following turn. You need to hit Daphne with basic attack to decrease Aiko’s damage. Minayomi then does a hard hitting ult on Position 1, 2 and 5.
Whenever a Boss hit below 50% HP, they will get a “Reverse” buff that removes their HP lock and grants all Bosses an ability (show on the rundown list).
Recommend kill order Asina > Aiko > Minayomi > Daphne. This is the quickest way to remove high threat targets. Or you can do Daphne > Aiko > Asina > Minayomi if you cannot handle the shield from Daphne.
An AoE team composition with Aiko + Iris (4* minimum, but 5* is the sweet spot) will also get you in under the Turn limit, but you will need heavy shields and healing to ensure success as the Reversed effects are applied to all units, which means that they will get extra attacks (2x at 50% potency) and extra debuffs (take more damage) for each attack that hits your units.
Enemy Profile

Disciplined Maid Sophie
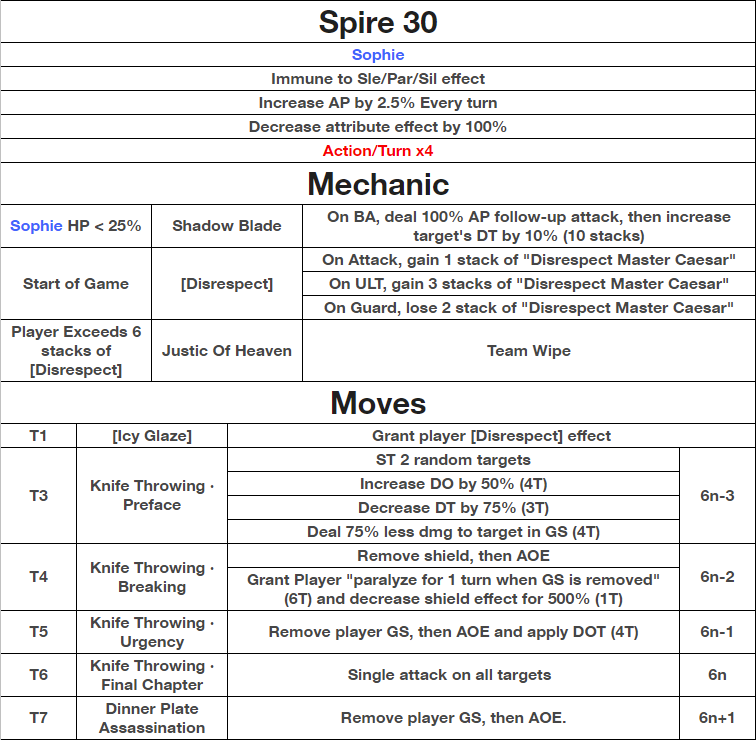
Starting Turn 1, each of your characters’ actions are being watched by Sophie. Their scores range from 0 to 6. Attacking increases score by 1. ULT increases score by 3. Guarding decreases score by 2. You are graced with a Team Wipe if any of your units exceed 6.
Starting on Turn 3, Sophie will begin with [Knife Throwing-Preface] and hit multiple times on 2 targets and gain various buffs.
On Turn 4 and every 6n-2, she casts [Knife Throwing-Breaking], an AoE which removes Shield, decrease Shield Effectiveness by 500% for 1 turn, and grant player “paralyze when Guard Stance is removed” for 6 turns.
On Turn 5 and every 6n-1, she casts [Knife Throwing-Urgency], first remove Player’s Guard Stance, then apply AoE and Damage Over Turn for 4 turns.
On Turn 6 and every 6n, she casts [Knife Throwing-The Final Chapter], a Single Target attack on all targets.
Finally, on Turn 7 and every 6n+1, she will cast [Dinner Plate Assassination], first remove Player’s Guard Stance, then apply heavy AoE.
The fight cycles from those abilities. Mainly manage your Ultimate skills, Attacking and Guarding so that you do not exceed 6 stacks of [Disrespect], Also make sure you do not guard randomly and have full HP on 6n-2 and 6n+1 turns, because you cannot Guard in those turns. Guard will paralyze your characters and you are pretty much dead on the next turn’s ability.
Enemy Profile

Bloodlust Volleyball KS-VIII
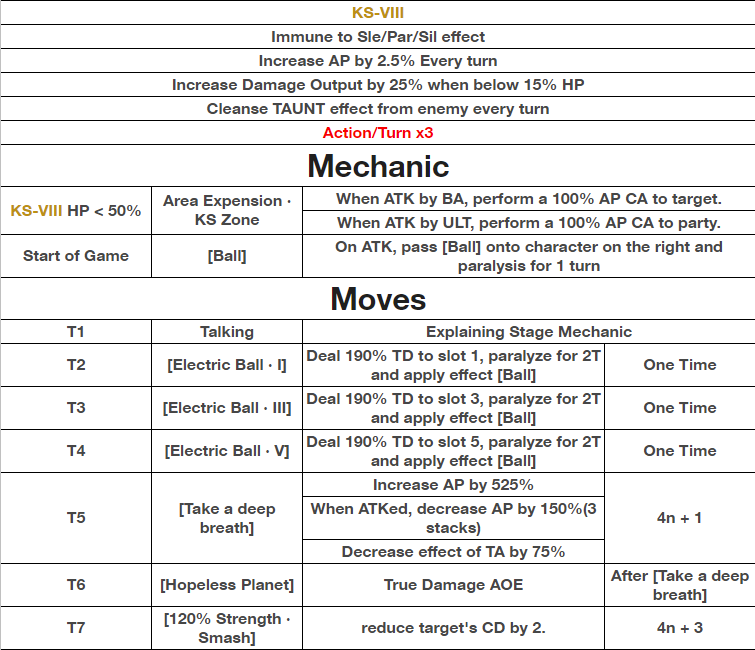
A rather straightforward stage. If you get confused, just check character status menu.
Start of the game she introduces the mechanic and pass the ball on pos 1, 3 and 5 for the next 3 turns. The units who “caught” the ball will become paralyzed and receive a positional debuff that will be pass onto the unit on her right when performed an attack. Guarding can “keep” the ball/debuff. The debuff will Paralyze that unit for 2 turns. You can “cheese” by having units immune to Paralysis or cleanse with Aiko if in Position 3. You can also clump the debuffs together by continuing to guard a unit with the debuff while passing the other 2 debuffs to that unit over a few turns. Remember to take action on the character before they get passed on the ball.
Starting on Turn 5 and every 5n turns, she will prepare an ultimate that deal True Damage AOE for the following turn. During the prep, each attack on her will reduce her Attack Power, up to 3 times. If Guarding or 2 Attacker won’t help you survive, you should bring a 3rd attacker to reduce her damage more. The Boss Ignores taunt, so tanks are not much help.
Just take a hit!
S6-60 S7-40 S8-20

Slightly Overworked Nana

Loyal Maid Aiko

Stubborn Shizuka
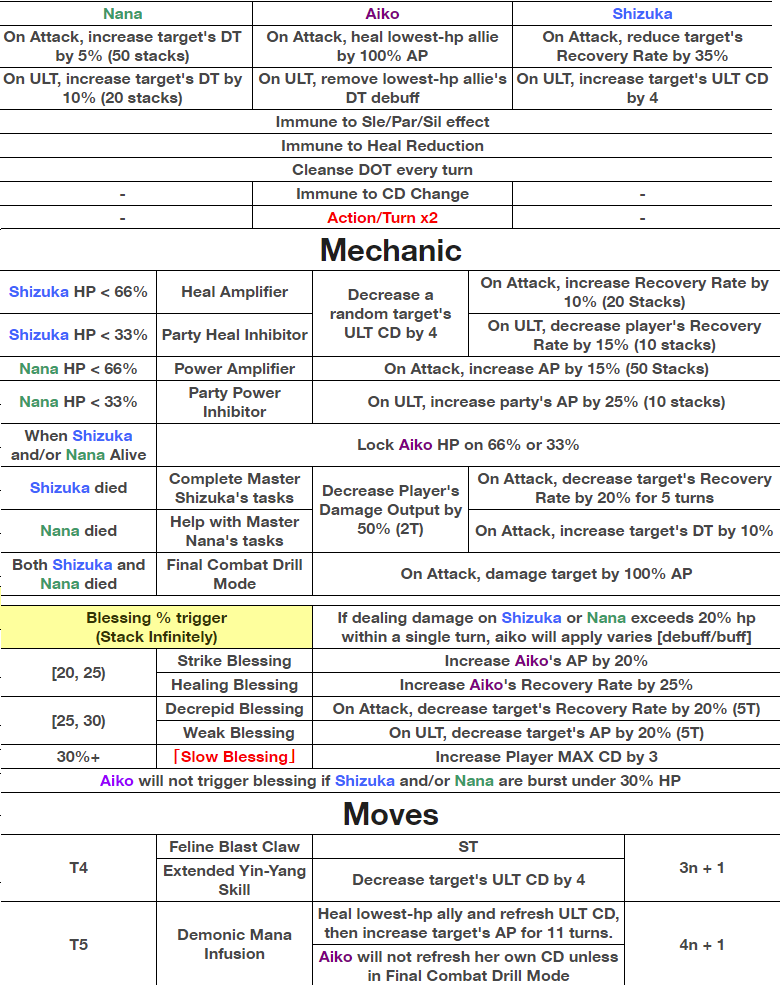
Goal: Kill all enemies to complete the stage.
Aiko begins the battle with the ability: HP can’t go below 66%. Only when you have downed either Shizuka or Nana, this ability will change to: HP can’t go below 33%. Once the other duo (Shizuka/Nana) has been downed, then can you kill Aiko.
Aiko heals twice per turn and her ULT cleanses Damage Taken debuffs for her ally which means characters like Minayomi and Summer Shizuka are less useful.
The important mechanic here is that you should avoid doing more than 20%% damage to Shizuka or Nana in one turn (You can deal 19% on each or all on Aiko, which she doesn’t have the penalty). Doing so will enable Aiko to grant her allies potent buffs and massive debuffs to you that will only make your run harder.
Doing more than 20% damage on Shizuka/Nana: On attack, increase recovery rate/attack for self
Doing more than 25% damage on Shizuka/Nana: On attack, decrease recovery rate/attack of target
Doing more than 30% damage on Shizuka/Nana: All your allies ult max CD is increased by 3
Upon downing one of the duos (Shizuka/Nana), Aiko will take over their duty and gain their buffs (E.g. if Shizuka is downed, Aiko will gained to ability to decrease target’s recovery rate). When both duos are down, Aiko will take a turn to enter combat mode, which allows her to deal damage on attack.
Nana has the following buffs: On attack, target takes 5% more damage. On ult, target takes 10% more damage (20 stacks max). Upon dropping to below 66% HP, Nana gains the ability to increase her attack power by 15% (50 stacks max). Upon dropping to below 33% HP, Nana gains the ability to increase her party’s attack power by 25% (10 stacks max) on ult.
Shizuka has the following buffs: On attack, reduce target’s recovery rate by 35% for 3 turns. On ult, increase target ult CD by 4. Upon dropping to below 66% HP, Shizuka gains the ability to increase recovery rate by 10% (20 stacks max) every time she attack. Upon dropping to below 33% HP, she gain the ability to decrease all enemies recovery rate by 15% (10 stacks max) on ult.
Recommendation to kill Shizuka first because her ULT-delay ability slows the fight down tremendously. You need to take down Nana quickly afterward, since she gains Attack Power fairly quickly. Then Aiko has no threat.
Stop! It hurts!
S6-55 S7-35 S8-15

Fallen Dragon Karina
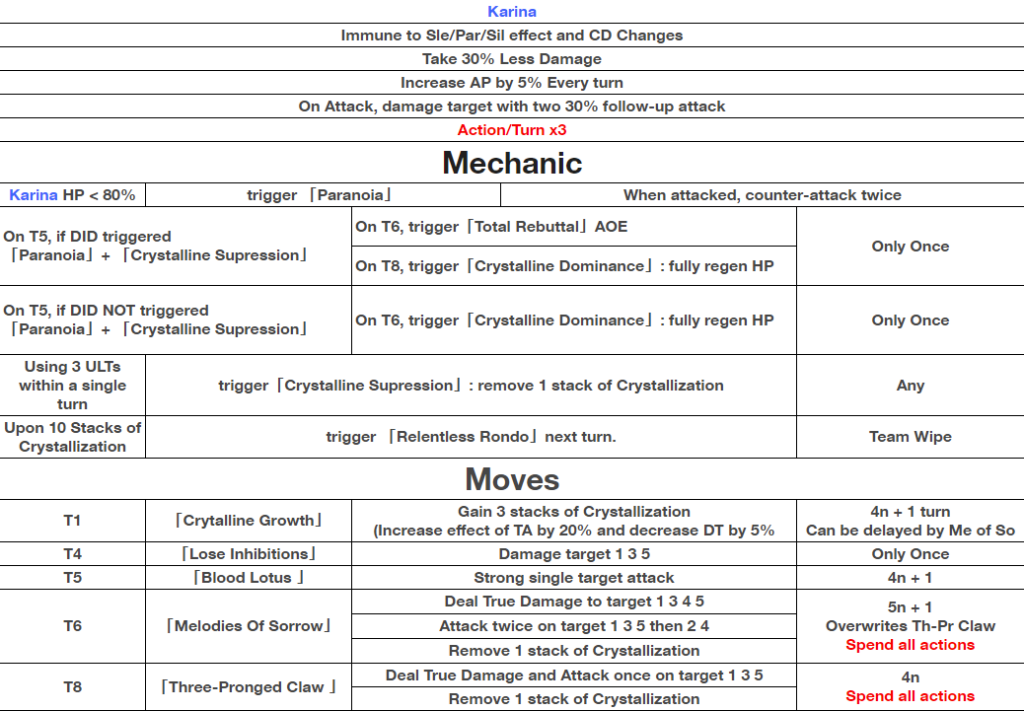
Another stat check floor.
Karina starts off the fight with 3 stacks of Crystallization, which decrease her Damage Taken by 5% each stack. You will need to use 3 ULT on the same turn to trigger [Crysalline Suppression] in order remove 1 stack of Crystallization. Karina also attacks 3 times a turn, dealing 2 follow-up hits of 30% power each per attack.
On Turn 6, she will trigger [Crystalline Dominance], which regain HP to max. There’s a small mechanic such, on Turn 5, if her HP is below 80% and you triggered [Crysalline Suppression] on that turn, she will delay the heal to Turn 8. You could also deny her heal by using Healing Reduction such as Summer Nana, and OG Shizuka(3*).
Start on Turn 1 and every 4n+1 Turn, she will cast [Crystalline Growth] which will gain her 3 stacks of Crystallization.
On every 4n Turn, she will cast [Loose Inhibitions/Three Prolonged Claws] that targets pos 1, 3 and 5. (Loose Inhibitions is replaced by Three Prolonged Claws after Karina uses Crystallization Dominance) (Three Prolonged Claws is the stronger version of Loose Inhibitions, where it deals True Damage plus 1 more hit on pos 1, 3 and 5 ).
On Every 5n+1 Turn, she will cast [Melodies of Sorrow], she will deal True Damage to target on position 1, 3, 4 and 5 plus 2 more hits on all positions.
You need to constantly use 3 ULTs on the same turn to remove Karina’s stack, as well as give yourself some breathing room from her onslaught. If her got 10 stacks, she will cast a team wipe ability.
Recommended to bring a strong Shielder and/or Guardian with taunt to absorb the hits and/or just guard against Melodies of Sorrow as choosing to guard Three Prolonged Claws on top of Melodies of Sorrow means that you are not going to pass the stat check and will most likely end up taking more than 30 turns to down Karina.
You are such a lightweight
S6-50 S7-30 S8-10

Oni of Bliss Ibuki Shuten
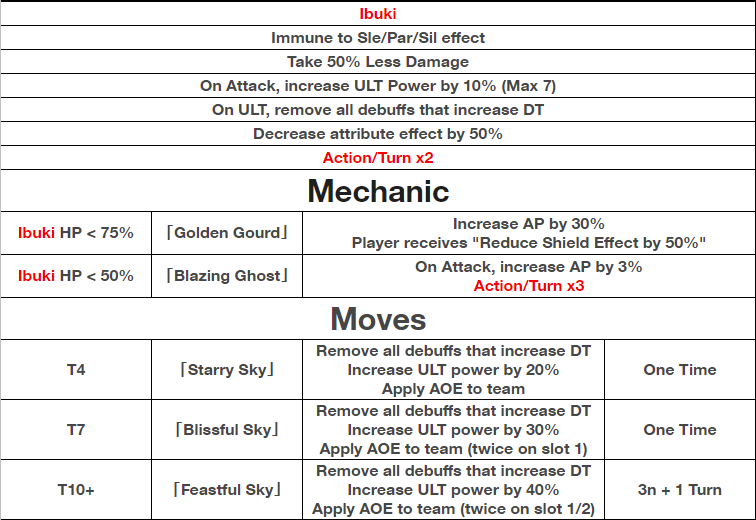
This stage is a straightforward DPS race. She gains a 10% ULT power for every attack and removes any debuffs that increases her the Damage Taken, on ULT.
She has 3 phases:
First phase(100%-75% HP) is standard.
Second phase(75%-50%), she casts [Golden Gourd] and regain some HP, then increase Attack Power by 30% and reduce Player’s Shield Effectiveness by 50%.
Third phase(50%-0%), she casts [Blazing Ghost] and regain some HP%, gain 3% Attack Power on Attack, and attack 3 times a turn.
On Turn 4, she casts [Starry Sky] that deal heavy Single Target damage across all characters.
On Turn 7, she casts [Blissful Sky] that deal heavy Single Target damage across all characters and again on position 1.
On Turn 10 and every 3n+1 turn, she casts [Feastful Sky] that deal heavy Single Target damage across all characters and again on position 1 and 2.
After her offensive abilities, she gains ULT power, which mean she will able to stack more damage faster as the turn goes on. The longer you let Ibuki live, the harder she hits. It is best to face her ULT either with a shield, guardian with taunt or simply have the HP pool to tank it, especially slot 1 and 2, which will get hit twice at later stage.
SM Baptism
S6-45 S7-25 S8-05

Angel of Healing Water

Angel of Sacred Fire

Sacred Blessing Saint Milae

Angel of Darkness

Angel of Gale
Goal: Kill all enemies to complete the stage.
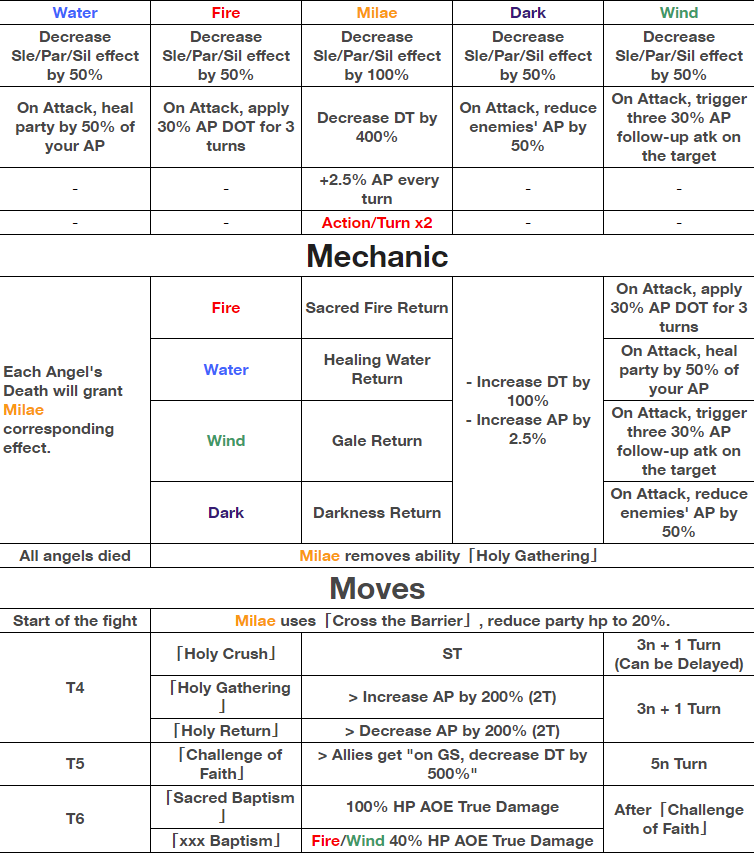
Milae starts the fight by setting all your allies to 20% of their MAX HP, and cannot be damaged until all 4 other angels are dead because starts with 400% Damage Reduction. Each Angel’s death will grant Milae their ability, and increase her Damage Taken by 100%. Bring enough healers/shields to bring your HP up to a healthy amount to continue the rest of the fight.
On Turn 4n, the angels will buff Milae by 200% Attack Power during [Holy Gathering] and reduce their own Attack Power by 200%, then Milae will follow up with a [Holy Crush], a heavy ST ULT.
On Turn 5n, Milae prep for Baptism, in which your team will gain a buff that reduce Damage Taken by 500% while in Guard Stance. You have to guard your whole party on the next turn because Baptism deals 100% MAX HP True Damage AOE(Fire/Wind Angel will do 40%), so it is also recommended to kill Fire/Wind first, if you cannot afford to kill them all at once. Milae will also follow up with a heavy ST (Not to be confused with Holy Crush) to one random character the following turn.
Milae’s Holy Crush and avenging her fallen angel’s heavy ST can be delayed as Baptism takes priority to occur on every turns of 5 (Turn 5/10/15 readies Baptism, Turn 6/11/16, deal AoE wipeout if not guarded). Once Milae has finished conducting her baptism, she will resume casting Holy Crush and heavy ST.
Avoid killing an angel before the turn where Holy Gathering will be cast unless you are able to tank both Holy Crush and Milae avenging her fallen angel’s heavy hit.
Vampire and Dreameater
S5-45 S6-25 S7-05

1000 Year Elder Lotiya

1000 Year Elder Aridya
Goal: Defeat Lotiya to complete the floor.
Aridya is troublesome on this floor as she inflicts debuffs that increases the damage your units will take. You can keep her in check by inflicting her with sleep status constantly or bringing sleep immunity to your party (Aridya Leader to keep Enemy Aridya asleep, Marlene Leader to give party immunity to sleep etc.).
Lotiya starts the fight by inflicting a heavy DoT AoE to your whole party.
Lotiya recovers HP whenever she deals damage and attacks in a fixed pattern during her ults.
Lotiya will wake Aridya up on Turn 2, while not dealing any damage that turn.
On turn 5, Lotiya will cast a debuff, Excessive Blood Loss, preventing your units from healing for 3 turns
Lotiya often attacks with a fixed pattern, favoring units on Pos 2, 3 and 4 on even turns, and then Pos 1, 3 and 5 on odd turns. This can be easily figured by seeing who Aridya targets her sleep status with, as Lotiya will pile up on the damage by making use of Aridya’s debuff.
It is recommended to bring a strong guardian with taunt, like Satan, into this fight and have them placed on Pos 3 as that is the most heavily targeted position. The taunt will be capable of absorbing the sleep status from allies too as Aridya will only target the taunt, allowing breathing room for your other attackers to priortise attacking instead of guarding.
Snake Queen of the lame
S5-50 S6-30 S7-10

Servant A

Vengeful Mesmiia

Servant B
Goal: Defeat Mesmiia to complete the floor.
The gimmick here is that Mesmiia will apply very strong debuffs to your team (E.g. Your team will take 60% more damage from basic attack, 30% more damage from ult attack)
The servants will not attack you.
Their role here is to give you a one-time cleanse from Mesmiia’s debuff.
Having 2 servants mean you’re given 2 cleanses throughout the whole fight (Only one character needs to hit/damage the servant to trigger the cleanse for the whole party, the rest can continue hitting mesmiia).
PERSONAL RECOMMENDATION: Cleanse on Turn 7 and then Turn 12.
Mesmiia will reset everyone’s ult the following turn once you have used your ult to damage her (So hold off on ult-ing too early if you want to align and do more damage).
Also take note that per ult damage on mesmiia, she will gain a 33% def against ult damage, meaning you shouldn’t use all 5 to ult her. Choose your best multiplier to go together.
Units with strong basic attack buffs are favored in this floor.
Middle Schooler’s Day Dream
S5-55 S6-35 S7-15

Emancipated Dragon Iris

Queen Daphne Bloom
Goal: Kill all enemies to complete the stage.
Daphne will start a trial on 5n turns (Turn 5, 10, 15 etc.)
The trial you will get can vary amongst the 4 listed below, so read carefully
Energy buff ‘X’: Hit Daphne ONLY X times with Ult
Energy debuff ‘X’: Hit Daphne ONLY X times with Basic Attack
Failure to meet the above requirements will result in Iris releasing a wipeout the following turn.
As Iris inflicts a DoT to your team that can get progressively harder to deal with, it is important to note that before the turn Daphne begins her trial, your units receive a buff (Nether Breath) to cleanse the DoT on themselves by guarding. (On turn 4, 9, 14 etc.)
Iris and Daphne gets a buff upon dropping below 50% HP, increasing their damage and shields.
Upon killing Iris first, Daphne will take 3 turns to charge up a wipeout, meaning you will need to kill Daphne within that time frame.
If you chose the route of killing Daphne first, Iris will take 1 turn to charge up a wipeout.
It is recommended to juggle both their HP and spread your damage accordingly.
How to Exploit 101
S5-60 S6-40 S7-20

Magical Knight Tyrella

Bally
Goal: Kill all enemies to complete the stage.
Bally has an absurd amount of HP and damage reduction with tons of debuff and buff that you need to carefully read throughout the whole duration of the battle. Bally clears all debuffs every 2 turns. Bally can also cast Trinity (throughout the duration of the whole fight), a ST skill that damages and inflicts the target that was hit with a debuff causing them to take 30% more damage from light enemies and it is stackable.
Tyrella is nothing of importance but her dmg ramps up by 30% per phase, up to a total of 90%.
Upon dropping below 25% HP, Tyrella will prepare a wipeout the following turn. Be ready to burst down Tyrella if you are going to drop her below the mentioned HP threshold.
Bally goes through 3 phases, assuming the form of each archdemon (Satan, Iblis & Baal)
Upon dropping Bally below 99% HP, she will take one turn to give a terrible signal and take the Form of Satan the following turn.
In this form, she will have 5 turns of counter damage (along side a 70% damage reduction that last 5 turns)
The following turn after assuming satan form, she will cast Advanced Brutal Tears, a taunt which increases her damage by 650% on top of her 200% counterstrike.
Avoid attacking and have everyone guard (healers and supports are free to move unless they are capable of doing damage).
The following turn after this, Bally wants to have some fun and will cast AoE Magic Harmony Attack.
And will deal high damage to your units in Position 1, 3 & 5. (You need to guard the turn before)
During satan phase, Tyrella will gain her first buff (+30% dmg).
Once you drop Bally to below 66%, she will give another terrible signal before going into her second phase, assuming the Form of Iblis. (This is by far the hardest phase of the fight, with numerous wipeout conditions)
In this form, Bally will inflict a DoT on your units whenever she attacks (last 5 turns, along side a 70% damage reduction that last 5 turns).
Flaming Rose always targets units in pos 3 and occurs every 3 turns (Turn 15, 18 etc.)
Ponytail Slash always targets units in pos 2, 3 and 4 and occurs every 4 turns (Turn 12, 16 etc.). Any hits with Ponytail Slash on a unit that is not covered by shield or guard will allow Bally to lifesteal. If Ponytail Slash occurs on a turn that is a multiple of 3 (12, 24 etc.), it will be priortised and skip Flaming Rose.
If the following turn after assuming the Form of Iblis is neither Flaming Rose nor Ponytail Slash, Bally will use Anti-Magic Barrier, which negates one turn of damage. During Anti-Magic Barrier, Bally will give herself a debuff where she deals 50% less damage to targets that guard for 2 turns.
The following turn after Anti-Magic Barrier, Bally will cast Annihilative Flame, dealing high damage to one random unit (Recommend to guard all the turn before as it is a sure-kill without guard).
If none of the above meets their condition, Bally will perform 2 actions, either attacking twice or attacking once and casting Trinity to a random target.
Both Flaming Rose and Ponytail Slash have priority over Anti-Magic Barrier and will delay it by a turn, but Annihilative Flame has priority over both Flaming Rose and Ponytail Slash, skipping their use entirely.
During the entire phase of Iblis, it is important to note the following:
You need to always have one unit guard, the other 4 are free to do what you need.
Reason for this is that Bally will punish you with a wipeout if all 5 units attack/ult.
It is also noted that guarding position 3 is the easiest to manage as Bally often favors targeting units in position 3.
During iblis phase, Tyrella will gain her second buff (now +60% dmg)
Once you drop Bally to 33% hp threshold, Bally will give her final signal. The following turn, Bally will begin her final phase, Form of Baal
Honestly, this phase is the easiest.
Bally will reset your team’s ult CD to 0 and debuff your team with a 7 turn CD change immunity.
She will also begin ramping up her damage.
Bally will also cast several kinds of AoE, most of which can be easily tanked with shields or a high enough HP pool. Furry Accumulation can be countered against by using 2 ults on Bally on the turn she announces it, as she applies the following buff to herself: When attacked with an ult, decrease attack power by 50% for 1 turn.
During Baal phase, Tyrella will gain her last buff (now +90% dmg in total)
I recommend finishing off Tyrella the moment you reach Baal form.
Tyrella will also ready her wipeout if you kill Bally before her.
Bally will also start stripping you of your shield and you are vulnerable to getting one-shotted by Tyrella here.
Once you get rid of Tyrella, Bally is a pushover but still retains a high hp pool with damage reduction.